25 February 2010

Breaking Down Bird of Paradise

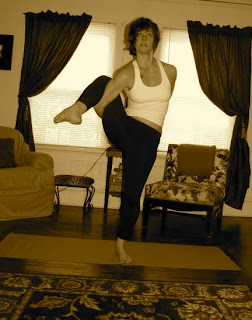
Earlier this week, a new student at Lifesouce Yoga & I were chatting between classes about how we began practicing Yoga & how long we'd each been practicing. As a fairly new student, Miss Shalamar was really interested, or rather intrigued, by some of the more advanced postures that make so many people who are unfamiliar with or new to Yoga scratch their heads & say, "Now wait...how in the world did she get her leg there!?" She even brought over an old issue of Yoga Journal we had at the studio with Seane Corn (one of the most incredibly strong & flexible yoginis around), on the cover & asked if I could get into the pose she was photographed in. Unfortunately, that particular pose was not one that I have accomplished yet so, I offered to show Shalamar a similar pose that also involved binding & a leg extension called Bird of Paradise. Bird of Paradise is one of my very favorite poses but more importantly, in terms of our conversation, it's a pose that was a monumental achievement in my Yoga practice. After first seeing the pose, Shalamar was certain there was no way she could ever do it. So, I began to break it down for her step by step & like with any new piece of information we receive or subject we're learning, it's always easier when broken down into manageable/digestible "chunks" (PR people think, sound bites!).  As soon as I showed her the basic poses she could do to prepare her for Bird of Paradise, her view of the pose immediately shifted from unattainable to attainable goal! She, graciously, even went so far as to say she was "inspired" by the insight I had given her on breaking down the pose which, was extremely humbling for me.  She was even the one to point out to me that I had just TAUGHT her how to work up to the pose. I, personally, am still so in awe of my teachers that I apparently don't realize I've picked up some of their knowledge through practicing with them!

So, why am I posting this? To toot my own horn? Hardly! The real reason I decided to share this with the whole blogosphere is that just a mere two to three days after Shalamar & I had this conversation, Bird of Paradise was in the next two vinyasa classes I went to that week! I guess it was the universe's way of saying that I had talked the talked so now I needed to walk the walk in class. I gladly did & then felt the further need to share my break down of the pose with all three people who read this blog. Enjoy!

Getting into this pose starts with establishing strong warrior 1 legs first. Front quad parallel to the floor. Knee directly above the ankle.


From warrior 1, you exhale & open up into warrior 2.


From warrior 2, you move into side angle by bringing your elbow down to your quad.


As this becomes less challenging, you'll work to place your hand on the ground & open up your chest & heart as if you were about bend all the way over to into a backbend. 


Once you've accomplished this, you can work on binding. If you're right leg is forward, you want to reach your right arm under your right thigh & your left arm over your back until your hands meet in a bind.


From here, you'll work on stepping your left foot up to meet the right while, maintaining the bind.


Once you're here & have established your balance, you want to begin to the lift your torso & the right leg up.


From here, begin to extend the right leg.

It may seem impossible at first but, give your body time. As you work through each posture & become more confident in each, you will find yourself quickly working towards achieving Bird of Paradise, or any other posture with this mentality! To me, that's the beauty of Yoga... Each day you find your limit. Then, the next day you might only be able to meet that same limit, but the day after that, you're body might be ready to move the bar & assume the more advanced expression of a posture. With time & patience you really can achieve just about anything. With Yoga, there truly is always somewhere to go!

Om Shanti Shanti Shanti!

18 February 2010

Gretchen the Yoga Teacher!

Yesterday I took the first step towards officially becoming a certified Yoga teacher when I (very excitedly) made my deposit for Jonny Kest's 20-hour teacher training weekend. Granted, once I complete this 20-hour training I will still have a ways to go (you know, just a measly 180 or 480 hours...) to obtain my full Yoga teacher certification. Regardless, this is a very exhilarating step for me in my journey towards becoming a Yoga teacher because once I have these initial 20 hours under my belt, I will be allowed to teach in some studios & can therefore gain direct, hands-on experience leading others through their Yoga practice. My hope is that, as I hone my teaching skills in these classes, I will be able to help other students find that place within themselves where Yoga becomes more than a cardio-intensive, glute shaping work out. I would love for everyone to find the place where their Yoga comes to life! If I'm able to make half the impression my incredible teachers have made on me, I'd love to have students coming to my classes because they know they're not only going to leave class drenched in sweat, but also with a calmer mind, the ability to breathe through trying situations, & a more peaceful, positive, & loving disposition. I feel that becoming a Yoga teacher & helping others find that sense of equilibrium between the body, mind, & spirit through practice of the asanas is a true honor.

I am absolutely beaming with happiness right now & cannot wait for my training weekend to begin!

Peace & Love,
G

11 February 2010


Ms. Christie Turlington, such a beautiful, intelligent, & inspiring Yogini.

09 February 2010

Stretch Out Before You Head Out

As an Ohioan, I fully understand that it can be harder now, during these gray, dreary months of winter, more than ever to get out of bed in the morning. On many such a morning, when the covers are finally peeled back & our feet hit the floor, our bodies are not truly awake yet. Somehow, though, our body's autopilot kicks in & we're mindlessly scrambling our way to the shower because we've overslept or begrudgingly dragging ourselves to the coffee pot for a caffeinated jolt of motivation. While the shower & coffee will definitely help us appear more prepared for the day, they won’t do a thing to ease the muscle tension, aches, or pains which, can occur from the way we sleep, as well as from starting day with a lack of awareness.
Not allowing our bodies just a few moments to fully wake up each morning can also affect us emotionally. Just think of the effects your physical fatigue & discomfort will have on the unfortunate loved ones, co-workers, friends, or strangers you’ll encounter as you make your way through the day feeling irritable, agitated, & full of negative or blocked energy.

To make all our lives a bit more pleasant, I put together a short series of stretches I found myself doing instinctively each morning as I eased my way into the day. All of these stretches are very basic Yoga poses that anyone can do; whether, you’re a beginner or an advanced yogi who doesn’t have time to practice until later in the day. Give the poses a try tomorrow morning while you’re waiting for the shower to warm up or while the coffee brews. I’m confident that taking the time each morning for a few gentle stretches, coupled with some deep inhalations & exhalations, will leave you feeling a little happier & slightly more calm, no matter what the day ahead may throw at you.

Tadasana


Stand with feet together, feeling grounded through the four corners of your feet. Stand tall with your hips tucked under, spine super straight, & shoulders pressing back & down your back. You can stand with your arms hanging down at your sides or you can press them together in prayer at
heart center. Take a few deep inhales & exhales here. On an
inhale, prepare to move on to the next pose...

Inhale your arms overhead. Actively & purposefully reach up from your rooted feet through your legs, waist, shoulder sockets, all the way through the very tips of your fingers. Take a few breaths here & on an exhale begin to hinge at the hips as you move into the next pose...

Uttanasana (Standing forward fold)

As you exhale, hinge at your hips & fold forward. Let gravity pull your head down as your sits bones reach higher & higher. As you hang here, let the weight of your head naturally pull you forward, deeper into the stretch. You can also wrap your hands around each elbow to create a sort of cradle around your head. If you'd like to go further, you can interlace your hands at the small of your back & then lift them up off your back & towards the floor. Take a few breaths here, in whichever modification you choose, & then, prepare to move on with your next inhale...


On the inhale, begin to come up as if you were returning to a standing position but, stop half way up, create a long, flat back. You want to
imagine your tailbone, spine, neck & head form one perfectly straight line. Hold here until for a moment & then as you exhale, fold back down into your legs.


Use your next inhale to lift you all the way back up to standing. Circle your hands up & overhead as you come to stand. Close the pose by bring your hands through heart center in prayer.


Cat/Cow
Find your way down to the ground, on all fours, in "table-top" position. You want your wrists to be directly under shoulders & your knees should be hip distance apart. These poses are great for awakening the spine & core.

Enhale as you arch your head up & back as you let your stomach sink towards the floor & you push your sits bones up towards the ceiling . This is Cow pose.


On your inhale, drop your head down to the floor. Then, lift your stomach up & as your arch your back up towards the ceiling like a cat.

You can repeat the Cat/Cow series 3, 4, or as many times as you like using deep inhales & exhales to move you from pose to pose.